AWS for Forensics (2)

My last blog post covered some initial things you might run into when choosing to setup analysis systems in the AWS cloud infrastructure.

Since that last writing, I have had some new experiences in capturing evidence across multiple regions and availability zones in AWS, which has certainly given me some new insight which I can share and hopefully be of some use.

Launching an Instance

In AWS EC2 an instance is just a virtual machine, there are a number of host operating systems and configurations available depending on your use requirements. For the purposes of performing evidence collection or analysis in AWS, you should at least have a system with enough storage attached to capture your evidence. Again, the requirements for your evidence collection may change depending on the type of case you are working on, the locations of these evidence sources and other factors, such as time.

To spin up a system, it is as easy as logging into the EC2 console and choosing the instances menu and your AMI image which is a system image with varying host Operating Systems.

Screen Shot 2018-06-23 at 8.41.33 am

It’s worth noting at this point that there is the option to select “Free tier only”. If you, like me, are a skinflint, this is the one for you.

Screen Shot 2018-06-23 at 8.43.21 am

Once you have decided on your AMI, this is when you can choose the hardware configuration of your system.

Try not to get too carried away here…

Screen Shot 2018-06-23 at 8.49.51 am

The next thing we need to do is configure instance details which relate to Networking, scaling, IAM roles and monitoring.

Screen Shot 2018-06-23 at 8.55.40 am

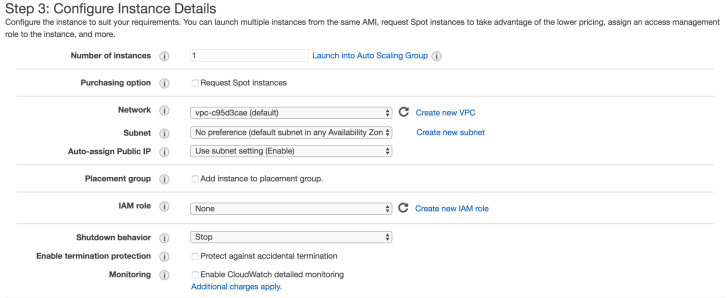
I’m not going to cover everything on this screen but will drop some links for extra reading.

At a very basic level, the options I would pay attention to are:

1: Shutdown behaviour. If you wish to terminate your instance when it is shut down this will erase storage on any local drives. Probably not best to set this if you’re looking to preserve evidence. Great for an attacker.

2: Enable Termination protection. See above.

3: Cloudwatch Monitoring. Cloudwatch is essentially the equivalent of a console access logging and firewall service. Logs from this are highly valuable when investigating as they can show uploads and access to instances or volumes as well as access to the AWS console itself.

While using AWS for performing any forensic analysis or evidence collection, you should absolutely have this turned on. Auditing and logging of your analysis and processes can be assisted massively with this functionality.

4: Tenancy. The option over tenancy may be something you need to consider for legal parameters as this relates to the shared physical storage devices in the data centre where your instance will reside.

Once we have these configurations, we can move onto adding our storage.

Screen Shot 2018-06-23 at 9.36.37 am

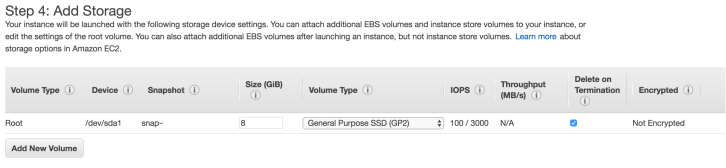
The initial configuration for an Ubuntu AMI in the free tier is 8gb storage. Increasing the boot volume size to at least large enough to store your tools and dependencies is fairly obvious. I’d also attach a volume here to capture evidence to and consider changing the options for “delete on termination”. You can attach and detach volumes later on so if you’re uncertain at this point it is safe to continue without. Encryption of your volume should be fairly self-explanatory.

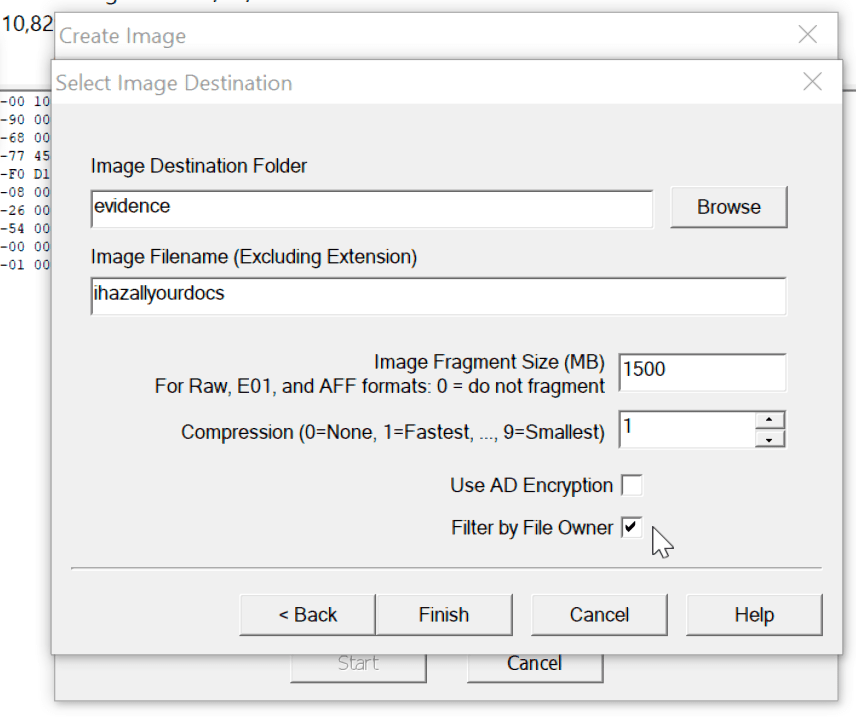
Creating and adding tags is something I would consider in depth at the earliest outset while scoping your evidence. This is similar to having a naming convention for internal systems in an office or naming evidence exhibits in a case and I found this the best method for maintaining continuity in both of these areas in AWS.

Screen Shot 2018-06-23 at 9.45.05 am

Lastly, we want to lock down access to our instance which is done through “Security Groups”. Security Groups essentially allow us to implement firewall rules to block or allow certain types of traffic via defined IP’s, CIDR blocks, ports and protocols.

Screen Shot 2018-06-23 at 9.50.31 am.png

For my instance, I have configured the security group to only allow access from my own IP at home and at work.

Once we review our instance we can hit launch and within a few minutes we will have our system up and running. Always remember to shut down your instances when not in use, this can become quite a costly affair for the higher spec instances.

Screen Shot 2018-06-23 at 9.56.08 am

Instance State can be changed by right-clicking on the instance. Notice the ‘Name’ column, this is a defined tag in AWS and how I prefer to specify evidence names and analysis systems.


So that’s about it for spinning up your first AWS instance, next I’ll cover how to connect into your instances using different methods.

Reference:

https://aws.amazon.com/autoscaling/

https://docs.aws.amazon.com/AWSEC2/latest/UserGuide/using-spot-instances.html?icmpid=docs_ec2_console

https://aws.amazon.com/documentation/vpc/

https://docs.aws.amazon.com/AWSEC2/latest/UserGuide/iam-roles-for-amazon-ec2.html?icmpid=docs_ec2_console

AWS for Forensics (1)

Initial Account Setup

Emerging Cloud technologies like Amazon Web Services (AWS) are going to change the face of traditional forensics forever. Soon, we will rarely get our hands on physical evidence sources attached to systems like this. This leaves a large number of uncertainties surrounding evidence handling, continuity, security and legal permissions both home and overseas.

Hopefully, this series of posts will help navigate through the acquisition and analysis of these sources.

Some quick observations on account creation:

  • I used a protonmail account to sign up for AWS. (It’s quite common for online services to block protonmail accounts for signup nowadays)
  • You must provide a full address and credit card details for account creation. (Amazon will have this on record if you have the legal authority to request when investigating)
  • Amazon uses their own terminology for everything and there’s a bit to learn if you have no previous experience.
  • It looks strangely like the Kindle store.

Anyway… AWS comes in three different flavours as you can see below: (I chose the cheapest Basic Plan, cause I’m a skinflint)

Screen Shot 2018-05-28 at 7.37.31 pm

Elastic Cloud 2 (EC2) is the service I chose once I selected my plan. Although the LightSail service may provide similar capabilities, I’ll just focus on EC2.

Before you go any further, this is a good point to make some initial assessments.

1: Pricing, what is your budget going forward?

I found that information relating to this was difficult to find prior to punching in the credit card details. I have included at the end of this post the pricing (AUD) for various hardware configurations and data throughput costs as of 28 May 2018.

2: What type of evidence are you analysing and how?

This could range from large batches of server logs, another AWS instance, volume or image. Perhaps you have a forensic image that you already acquired and uploaded for analysis. You may be trying to ascertain successful logons to the AWS platform itself.

It is extremely important at this stage to determine your host OS and the physical characteristics of your instance, such as memory, VCPU’s and storage.

Gaining an understanding of your evidence sources, analysis tools, the load on system resources and the potential size of any exports will help you figure out your AWS configuration.

3: Where is your target evidence located?

Amazon splits web services into international regions and if you wish to analyse a snapshot of another AWS instance, you will need to ensure your analysis instance is hosted within that same region.

I’m not sure of the cost or time implications of transfer between regions but I have been advised this does involve a physical move of data across regions to different data centres.

4: How do you secure the environment and, in turn, your evidence?

Amazon has a number of measures in place to ensure the environment is secure. This includes sys logging for your instances, advanced monitoring (a pay for service) and EC2 key pairs where the .pem private key file can be used for SSH connectivity.

There is also multi-factor authentication through Google authenticator or similar mobile applications and the ability to lock down access to your instance by specific IP addresses and ports. These are just a few suggestions, there are many other factors you may need to consider along the way.

If at this juncture, you are wondering why on earth would I use a system in AWS to perform forensics then I’ll direct you to the general purpose pricing models below where you can check some of the tech specs of the servers!

Next up… I’ll cover how to launch an AWS instance.

AWS Pricing

General Purpose – Current Generation

 vCPU  ECU  Memory (GiB)  Instance Storage (GB)  Linux/UNIX Usage

t2.nano

1

Variable

0.5

EBS Only

$0.0073 per Hour

t2.micro

1

Variable

1

EBS Only

$0.0146 per Hour

t2.small

1

Variable

2

EBS Only

$0.0292 per Hour

t2.medium

2

Variable

4

EBS Only

$0.0584 per Hour

t2.large

2

Variable

8

EBS Only

$0.1168 per Hour

t2.xlarge

4

Variable

16

EBS Only

$0.2336 per Hour

t2.2xlarge

8

Variable

32

EBS Only

$0.4672 per Hour

m5.large

2

10

8

EBS Only

$0.12 per Hour

m5.xlarge

4

15

16

EBS Only

$0.24 per Hour

m5.2xlarge

8

31

32

EBS Only

$0.48 per Hour

m5.4xlarge

16

61

64

EBS Only

$0.96 per Hour

m5.12xlarge

48

173

192

EBS Only

$2.88 per Hour

m5.24xlarge

96

345

384

EBS Only

$5.76 per Hour

m4.large

2

6.5

8

EBS Only

$0.125 per Hour

m4.xlarge

4

13

16

EBS Only

$0.25 per Hour

m4.2xlarge

8

26

32

EBS Only

$0.5 per Hour

m4.4xlarge

16

53.5

64

EBS Only

$1 per Hour

m4.10xlarge

40

124.5

160

EBS Only

$2.5 per Hour

m4.16xlarge

64

188

256

EBS Only

$4 per Hour

Data Transfer IN To Amazon EC2 From

Pricing

Internet

$0.000 per GB

Another AWS Region (from any AWS Service)

$0.000 per GB

Amazon S3, Amazon Glacier, Amazon DynamoDB, Amazon SES, Amazon SQS, or Amazon SimpleDB in the same AWS Region

$0.000 per GB

Amazon EC2, Amazon RDS, Amazon Redshift and Amazon ElastiCache instances or Elastic Network Interfaces in the same Availability Zone

Using a private IPv4 address

$0.000 per GB

Using a public or Elastic IPv4 address

$0.010 per GB

Using an IPv6 address within the same VPC

$0.000 per GB

Using an IPv6 address from a different VPC

$0.010 per GB

Amazon EC2, Amazon RDS, Amazon Redshift and Amazon ElastiCache instances or Elastic Network Interfaces in another Availability Zone or peered VPC in the same AWS Region

$0.010 per GB

Data Transfer OUT From Amazon EC2 To Internet

Pricing

First 1 GB / month

$0.000 per GB

Up to 10 TB / month

$0.140 per GB

Next 40 TB / month

$0.135 per GB

Next 100 TB / month

$0.130 per GB

Next 350 TB / month

$0.120 per GB

Next 524 TB / month

Contact Us

Next 4 PB / month

Contact Us

Greater than 5 PB / month

Reference:

https://docs.aws.amazon.com/AWSEC2/latest/UserGuide/ec2-key-pairs.html

https://aws.amazon.com/iam/details/mfa/

FTK Imager and Custom Content Images

FTK Imager

FTK Imager is renowned the world over as the go-to forensic imaging tool. While working in law enforcement I was always obsessed with ensuring I had captured the ‘golden forensic image’ which for obvious reasons, is still ideal and gives you all that unallocated spacey goodness.

But…

Modern day forensics and IR require answers. Quick!

As we all know, things have moved on quite rapidly from grabbing an image of a dead box and leaving it processing in your tool of choice over the weekend. This is mainly due to the issue that most units have; backlogs, lack of time and urgency to produce results. Whether it’s management in Law Enforcement looking for the silver bullet ‘Find Evidence’ button in Axiom (no digs at Magnet but please put that back in :)) or the large corporations incident responder needing to analyse hundreds of endpoints for one specific artefact.

Now, I’m not saying FTK Imager is about to answer either of those questions for you but there are some handy functions which I had never used until recently.

Custom content images in FTK Imager allow the analyst to add an evidence item and build a logical image (AD1… sorry XWF users) containing only files of their choosing.

This can be handy for a few reasons.

Perhaps time to capture evidence is limited.

  • This could involve accessing a users laptop remotely while it is only attached to the network for a short time. This may not be lawfully permitted in your country.
  • You could have been given a computer with no PSU and need to acquire evidence from it before the battery dies (as I once had to do in the back of a $380 taxi journey).
  • In the law enforcement world, there are any other numbers of reasons why you may be tight on time.

You have strict instructions on what to acquire.

  • You might only have legal permission to or have been asked to only extract specific files types.
  • You are capturing evidence from a shared computer and are only allowed to extract files specific to a user account due to legal privilege.

Here are some simple ways around some of these problems using FTK Imager, presuming you are working with Windows computers or existing images.

Custom Content Image by File Type

FTK Imager allows the use of Wild Cards to filter and find specific files stored on the file system. This is a great feature if you are looking for a file by name*, extension or batch of files with similar names.

* Noting that files by name may not meet all matching files in the way that hashing will.

Wild Card Syntax:

? = Replaces any single character in the file name and extension
* = Replaces any series of characters in a file name and extension
| = Separates directories and files

Wild Card Filters:

Users|*|NTUSER.dat
Users|*|Documents|*.doc
Users|*|Downloads|Evidence ?.pdf
Windows|Prefetch|*

1: Start by browsing to your custom content item.

2: Then right-click and select add to “Custom Content Image”.

Add to.png

3: You can manually add custom content by selecting “New” using the wildcard option or “Edit” existing custom content.

Evidence Tree

Wild Card

*As far as I’m aware, there is not an option to save your custom content as a template. 

(Please let me know if you do, as I currently just use a text file as a template for files of interest for varying investigation types)

Creating Content Image by User SID

As previously mentioned, your scope may be limited due to shared computer use and while this may not be of too much importance for law enforcement, files belonging to a user may be marked as privileged by civil court orders.

We can use FTK Imager to create an image of only files owned by a specific users SID, the process is just as we defined previously but upon creating the custom content image you need to select the tick box to “Filter by File Owner”.

Filter.png

Once you have selected this, you will be presented with the respective file owners and their SID’s on the system.

filtebyowner1-e1527244381893.png

Collection for Incident Response

The last instance where these methods may be useful is if you have a handful of workstations where you need to collect some very specific files or artefacts from. I tend to use a text file as a template. Although this works, it is a bit clunky and slow.

There are a great many other commercial and open source tools which can already perform these tasks extremely well, such as f-response, X-Ways Forensic, GRR and so on. This option also doesn’t really work for incident response at scale but if you’re stuck without your commercial tools or have a very targeted approach for collections from a few computers, then this could work for you.

FTK Imager also comes in a lite flavour which doesn’t require any installation. 🙂

Reference:

https://support.microsoft.com/en-au/help/243330/well-known-security-identifiers-in-windows-operating-systems

https://accessdata.com/product-download

https://www.f-response.com/

https://github.com/google/grr

A Few Interesting iOS Forensic Artefacts

As of 2017, there were over 2.8 Million apps available on the Apple app store and close to that number on the Google play store. This is an uncanny number of applications, most of which are unlikely to ever be parsed and decoded by existing forensic tools.

How do we fill that gap?

As I’m sure we are all aware, common mobile forensic tools tend to parse applications pretty well but as with any forensic tool, these should always be validated. Tools are from time to time known to get things wrong or miss things.

At the start of our case, in order to not get bogged down, we should carefully consider the questions we aim to answer. Also, if the method of dumping a handset and relying on decoded data from our tool is going to answer these questions.

I thought I would try to identify some artefacts which exist in common apps which might help answer some attribution questions an analyst may be faced with.

The age-old question of ‘putting bums on seats’ or in our instance, ‘hands on the mobile device’ is often the aim for prosecution cases. Digging through some common application plist and database files should hopefully help show some of this type of activity.

Let’s take a look…

#Instagood

com.burbn.instagram.plist

Screen Shot 2018-05-10 at 9.47.08 am

As you can see we have a timestamp which shows the Instagram swipe down or page reload function.

Great for proving your kids were on Instagram when they said they were asleep.

#Earworms

ShazamDataModel.sqlite

Shazam provides users with the ability to identify music while on the go, great for those wriggly little earworms. Although, what you may not know is that Shazam is recording your location and times every time you Shazam a track. The format of this database table doesn’t appear to have changed over the last two years.

Highly useful for showing user interaction and bad taste in music…

screen-shot-2018-05-12-at-12-42-16-pm-e1526093015189.png

#SIMS

CellularUsage.db

Apple does quite a good job of preserving the list of SIM card ICCID’s which have been present in an iPhone and sometimes you may also see the phone number (MSISDN) which has been saved on that SIM card. This varies between providers and may not always be present.

The field storing the phone number (MSISDN) on a SIM is editable so not 100% reliable, although I have never seen it being modified in recent years.

screen-shot-2018-05-12-at-11-58-54-am.png

Last Known ICCID and telephone number can also be seen in the com.apple.commcenter.plist file.

#locationlocationlocation

CallHistory.Storedata

Perhaps not all that useful for cases where your device has always been in the same country but if you’re investigating someone who tends to travel, it would be nice to know where they were when they calls were made. Again, with a simple SQL query, you can pull out this information.

screen-shot-2018-05-12-at-10-49-23-pm.png

#layouts

iconstate.plist

If you are interested in identifying how the UI looked then you will notice that you can identify the custom strings, including emojis as headers for the groups of app icons on iOS. In our iconstate.plist file these can be read from left to right, top to bottom to visualise the layout of the apps and second panes of apps are nested in another array, as can be seen in the example below.

iconstate

iconstate2

#podcasts

MTLibrary.sqlite

According to FastCompany “In March 2018, Apple Podcasts passed 50 billion all-time episode downloads and streams.” Thankfully for us, Podcast episodes are all tracked in a database stored on the iPhone and there’s useful information in here about when the podcast was downloaded to the device and also when it was last played.

Showing when a podcast was last played could go some way to corroborating whether or not someone was listening to their headphones when they should have been listening to their college lecturer.

Screen Shot 2018-05-14 at 2.53.21 pm

If you don’t listen to the Wired UK Podcasts, then it’s definitely worth a pop.

Hopefully, this quick write up on some iOS artefacts will help someone out. I believe these may be of some assistance along the way to attributing usage and location of devices at very specific times. I’m sure the commercial tools out there already extract some of this information but an analyst should be able to parse this information themselves.  Identifying app data that a tool may have missed and ensuring your evidence is verified as accurate should be paramount.

Budget iOS Device Extraction

Back in the early days of iOS extraction, the Zdziarski Method was the goto for acquiring a forensic image of an iPhone. This was quickly adopted by many of the main products and for a short period, all was well with the world of Apple device forensics, until Apple applied hardware encryption.

This has since left analysts with the options of varying levels of logical acquisition and decoding provided by the main vendor’s products, provided you have the passcode/backup password for the device. Obviously, there have been recent advances with offers to LE from main vendors to bypass passcodes and the new Grayshift black boxes on offer.

A large portion of the information which we as analysts want to parse and analyse does tend to sit in many of the logical areas accessible by these tools and some of the extraction methods are essentially just iTunes backups.

So what if we could extract iTunes backups using some open source tools using just our Mac or Linux box?

Enter Homebrew and the libimobiledevice tools.

Homebrew

Homebrew is a package manager for macOS which allows you to run Linux tools natively on the mac.

Installation

Installing Homebrew is pretty trivial and instructions for this can be seen on the Homebrew site: https://brew.sh/

Once Homebrew is installed, we need to then add the libimobiledevice cask.

This can be done by running the command to install:

brew install libimobiledevice


Extraction

Running the ideviceinfo command initially shows the following output:

ideviceinfo

We will be required by iTunes to unlock the iPhone with the users passcode and then selecting trust on the handset, and entering the passcode a second time.

iTunes

iPhone Trust

Once we have trust between the iPhone and Computer we can then continue to query the device.

With the ideviceinfo tool, we can establish some basic information about the device.

BluetoothAddress: 8x:xe:x2:xa:1x:xa
EthernetAddress: xc:8x:x2:xa:x6:ax
FirmwareVersion: iBoot-4076.50.126
IntegratedCircuitCardIdentity: 8961xx46xxxxxxxxx9
InternationalMobileEquipmentIdentity: 358xxxxxxxx66
InternationalMobileSubscriberIdentity: 50502xxxxxxxx6
MobileEquipmentIdentifier: 35xx71xx553xx6
PhoneNumber: +61 000 000 000
ProductName: iPhone OS
ProductType: iPhone8,1
ProductVersion: 11.3.1
TimeZone: Australia/Sydney
WiFiAddress: 8c:8e:xx:4a:16:xx

For analysts who have worked in units or departments where they have the authority to perform subscriber checks, you will spot some important information here which can be used and go a long way to attribution. You will also notice that there is information here which can be used to identify the device on wireless networks.

I will generally send the output from this command to a text file to accompany the backup. As you can see there are a number of options including one to dump a list of files to CSV, unpack the backup and also to disable backup encryption (you will need to feed it the backup password to do this).

Screen Shot 2018-05-11 at 9.44.34 am

We can perform an iTunes backup from Terminal using the following command:

idevicebackup2 backup /pathtobackup

Screen Shot 2018-05-09 at 9.50.49 pm

Screen Shot 2018-05-09 at 9.51.23 pm

screen-shot-2018-05-09-at-9-58-47-pm-e1525867202811.png

Once it completes, we are free to start interrogating our backup using other tools whether that be a product from one of the main vendors, other open source tools or some of the cheaper products which fall somewhere in-between. Please note that the iTunes backup password will be required to decode the contents of the backup.

Reference:

http://www.libimobiledevice.org/

https://brew.sh/

https://www.zdziarski.com/blog/

https://graykey.grayshift.com/


Hashing in X-Ways Forensics

A bit about hashing

In digital forensics, hashing is generally used as a method of verifying the integrity of a forensic image or file. The MD5 algorithm has become the accepted standard and used worldwide. Without getting into a long conversational piece about hash collisions and other more reliable and faster methods, MD5 for most purposes is still sufficient.

File hashing has had a long grounding in Law Enforcement cases to identify known good and known bad sets of image file hashes.

Known good hash sets allow an analyst to reduce their data set within their forensic evidence dramatically by removing any files/images related to software and operating systems. NIST has kept the NSRL hash sets updated for a number of years and these among others are widely used to perform this function.

Known bad hashes of images, particularly for indecent image cases are more controversial and have led to many a late-night discussion over how these should be used, managed and categorised.

The major benefit of generating known bad hash set(s) for indecent image cases, is that you are minimising the exposure of the material to the analyst. I believe having a centralised (accurate) hash database to be of utmost importance for the sanity of all those individuals who spend their time categorising images.

The other knock-on effect of using hash sets is that it decreases the analysts time to complete their work, which for overburdened Cybercrime units can only be a blessing.

File hashing can also be used to differentiate files across multiple sources, identifying specific files across evidence sources and assisting with identifying malware (although this is not a full proof approach for malware analysis).

Anyway, on to how we can utilise hashing in X-Ways Forensics.

Hashing in X-Ways Forensics

I’ll start off by making the assumption that you have a basic understanding of how to use X-Ways.

First, you will need to establish a storage location for your hash database(s). X-Ways comes with the option to configure two different databases, this can be useful if you have hashes using different algorithms such as MD5 or SHA1.

Another consideration when configuring the storage location is speed, configuring your databases on an internal SSD RAID would be optimal if you are going to run this locally.

To configure your hash database locations select the following in X-Ways

Tools > Hash Database

HashDB-config

Once you have created the databases in your desired locations. You can start to import your hash sets.

HASHDB

You could also create your own hash sets from known good or bad sources, I tend to install fresh offline copies of Windows and create sets from these as I know I can thereafter speak to their integrity. You can also assign a category or hash set name during import, this can be extremely useful when performing differentials.

Please note that if you create any sets from your evidence after your initial hashing you will need to rehash the evidence in order for the new results from these sets to appear.

As you can see from the screenshot below we already have a couple of hash sets added to our database.

RVS_2

Once you have your database configured you can proceed and hash your evidence using the refine volume snapshot feature. This can be done across an entire volume or selected files only.

To perform this function select the following options:

Specialist > Refine Volume Snapshot > Compute Hash + Match against hash database

RVS

Once hashing has completed, files which have matched a set can be identified by the light green colour of the file icons.

HashedFiles

You now need to configure the directory browser to see the hashes, sets and categories.

This can be done by selecting:

Options > Directory Browser

Directory Browser options

You will now need to set the directory column size, once this has been set you can adjust by dragging the columns wider or narrower to suit your needs.

After these views have been enabled through the directory browser we can start filtering within X-Ways. From the hash set column, we can enable or disable the ‘NOT’ function to exclude particular hash sets…

screen-shot-2018-05-07-at-7-27-19-pm-e1525685372669.png

.. and from the category column, we can show or hide irrelevant, relevant, notable or uncategorised hash categories.

Category

screen-shot-2018-05-07-at-7-27-08-pm.png

This approach combined with the other filtering functions in X-Ways allow the examiner to cut and dice their output quite extensively. Outputting the directory browser view including the hash sets and categories to csv can allow further review in Excel if that tends to be your tool of choice. This can then quite easily be delivered as a product in your casework.

That’s really it for how I tend to uses hashes in X-Ways.

Useful links and videos for further reference on hashing:

https://en.wikipedia.org/wiki/MD5

https://www.hashsets.com/

https://www.owasp.org/index.php/OWASP_File_Hash_Repository

https://www.nist.gov/itl/ssd/software-quality-group/nsrl-download

https://www.forensicmag.com/article/2008/12/hash-algorithm-dilemma%E2%80%93hash-value-collisions


Windows 10 Timeline – Initial Review of Forensic Artefacts

As you may be aware, there is already a plethora of forensic tools available for producing system timelines, all with their own capabilities and some with limitations. From Sleuth Kits FLS/Mactime, Plaso/Log2timeline, XWF, Axiom, Encase and more recently Timeliner for Volatility.  I’m sure many more have performed this function to varying degrees over the years but Microsoft hasn’t been one, until now.

Last patch Tuesday, Microsoft released Windows 10 update (1803) which has brought along a number of new features including a new Timeline function, which allows users to look back in time at their previous activities.

This got me thinking.

A built-in Windows utility which shows linear recent activity (within thirty days) on a computer system and runs under user context.

Very interesting… Let’s take a look!

File Creation/Opening

First I had to find out where Windows tracks all of this activity. A simple keyword search for a sample document name ‘This is a test document.docx’ exposed the following file as a potential area of interest:

C:\Users\User\AppData\Local\ConnectedDevicesPlatform\L.User\ActivitiesCache.db

Now, SQL is not my forte so I had a pretty rudimentary poke around by parsing it out to csv to see what I could find. The database file contains a number of tables and of initial interest, I would highlight the ‘Activity’ and ‘Activity_PackageID’ tables for a first look to interrogate this file.

Windows 10 Timeline

Windows 10 Timeline


In the ‘Activity’ table under ‘AppID’, Microsoft Word can be seen as the application used to open the file.

Screen Shot 2018-05-05 at 10.10.29 pm

From the ‘Payload’ entry you can identify further display options for the Timeline entry, including ‘Word’ and the display text being the filename.

screen-shot-2018-05-05-at-9-46-15-pm.png

Timestamps

Other notable entries found in the Activities Cache database are the associated timestamps. For our test document mentioned above, you can see the following timestamps which are stored in Unix format within the ActivitiesCache.db file:

Last Modified: Tue, 1 May 2018 20:28:18

Expiration Time: Thu, 31 May 2018 20:28:18

Start Time: Tue, 1 May 2018 20:28:18

Last Modified on Client: Tue, 1 May 2018 20:28:18

After some testing, I identified that the expiration time is as expected, thirty days from the entry start time. The timestamps do not appear to be updated after a file is deleted although the deleted file will remain visible in the Timeline (presumably for up to thirty days or when the database is purged). Timestamps do not appear to be updated within a twenty-four hour period, after modification to files.

Program Execution

The ‘Activity_PackageID’ table contains entries for applications which include paths for executables, executable names and also the expiration time for these entries. This activity not only shows applications that were executed within the last 30 days but by backdating the expiration timestamp, you may be able to identify a time when that application was run and by which user. This can obviously be correlated with other artefacts such as prefetch.

ActivitiesCache.db

This is just some initial testing and there is a wealth of further information in this file which will need further analysis to decode fully. It’s certainly nice to see some new functionality in Windows which not only serves a meaningful purpose for the end user but also provides examiners with another artefact showing user interaction, web browsing activity, program execution, file opening and creation.

Update:

Eric Zimmerman has written a tool now to parse this database and you can find that along with all his other amazing tools, here:

https://ericzimmerman.github.io/