AWS for Forensics (5)

Capturing Evidence from AWS

We previously discussed how to upload evidence into our AWS environment for analysis. This is something which clearly has benefits due to the ease of spinning up very high spec systems in a matter of minutes. In saying this, there are also inhibiting factors such as bandwidth availability, cost and legal issues which may arise. I don’t wish to cover too many of the technical elements, as there are mountains of information on Amazon’s site. We shall now cover some scenarios where we may need to capture evidence from AWS.

In any AWS evidence collection you are likely to require:

1: Appropriate access to the platform (if it’s not your own), including credentials and audit logging for your access.

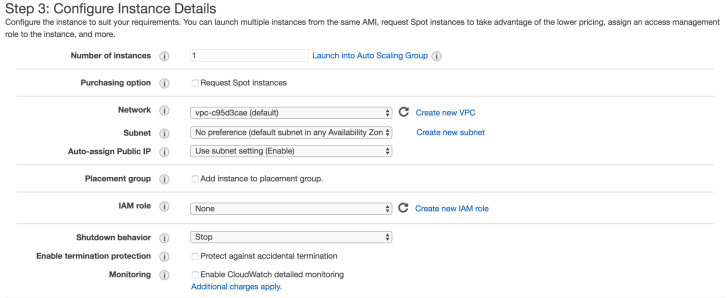
2: Analysis systems (scope AWS specifications prior to starting) with a full suite of tools in the AWS environment or your clients.

3: A thorough understanding of the infrastructure, evidence sources, time frames and objectives.

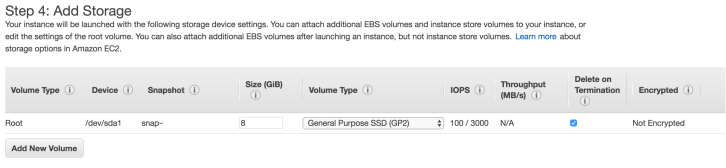
4: Evidence naming convention to apply as tags to volumes or snapshots, which can be used for continuity, chain of custody, and later identifying your evidence volumes.

5: For larger environments, consideration on what you will do with any volumes, snapshots or AMI’s once your collection/analysis phase is complete. eg download or deletion

(At scale, this approach of image preservation will cost a number of bit-schmeckles. An exit strategy which allows for maximum data integrity, evidence continuity and cost-effectiveness will pre-empt any difficult cost implications or conversations for you further down the track)

Sharing Evidence between AWS Accounts

There may be a few reasons why you would want to share a particular snapshot from your target environment. The target environment may be compromised, they may not wish to have you on-site for a number of reasons or you may just want to share snapshots to your own as this is where you have all your beefy instances and tools configured.

To share a snapshot from your target environment you will need to establish which AMI or Snapshot you wish to acquire, create a volume from this and then share the volume to your own platform.

I won’t discuss hashing but it should be self-explanatory that you need to establish a level of certainty about your evidence, particularly when physically moving data through data centres or downloading from the AWS platform.

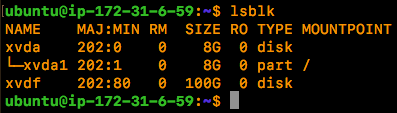
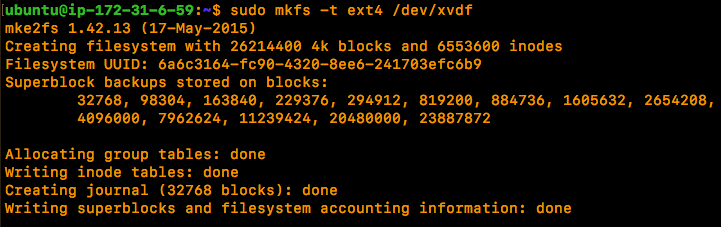
Once you have the volume moved to your own platform you will need to mount it read-only where you can proceed to interrogate it with forensic tools as you normally would.

You may wish to capture a forensic image of this volume at this time for continuity or for download and offline analysis. Depending on your case requirements and time constraints, you may also wish to interact with it directly in order to reach quick results.

Provided you have taken appropriate measures to capture your snapshots and volumes, interacting directly with the write blocked volume in this way is an acceptable approach for performing Incident Response (in my humble opinion).

That’s how I approached sharing a volume from the target environment to my own for imaging and analysis.

Analysis in your target environment

The other scenario you may face is where your client hosts data in regions which are outside of your legal jurisdiction or have non-disclosure agreements or other contractual obligations which will impact on your ability to physically take evidence away from their environment.

This can drastically impact on your ability to stick to the old dead box approach to capturing evidence where you capture the forensic image and download it for offline analysis. I recently worked on a case where no client data (stored in AWS) was to be accessed or taken outside of the client’s offices.

The approach devised involved setting up analysis workstations in multiple regions all over the world to mount volumes from systems which we suspected to be involved in the incident. We had to access these systems from within our client’s offices and through the process, only collect evidence which contained no client data. Essentially, this led to the bulk of our incident response investigation revolving around event logs, registry hives and file system metadata in order to meet these requirements.

This approach is essentially the same as sharing volumes to your own instance, although there are other implications:

1: Hardware dongles  You may wish to use hardware licensed software. We used Virtualhere to share ours up to AWS and this worked exceptionally well, although there were some firewall and routing issues.

2: IT assistance – Like all cases, administrators of the target infrastructure should be your best friends. Chances are you will need a lot of help from these guys when getting their environment configured to work for you.

3: Time – Depending on the amount of evidence you have to capture, time will definitely be against you. This is quite simply due to the way that AWS manages snapshots and volumes. You need to be very meticulous when creating volumes and documenting your actions.

4: Time – Because we never have enough of it…

So that’s a very high-level view of the approach I’ve used for capturing and analysing evidence in AWS.

Reference:

https://docs.aws.amazon.com/AWSEC2/latest/UserGuide/sharingamis-explicit.html


AWS for Forensics (4)

Cloud analysis of local evidence sources

One of the main benefits of analysing evidence in AWS is that we can spin up instances with vast amounts of processing power without too much trouble or cost (in the short term). This can greatly decrease processing time of evidence items and is really useful when you need to determine answers quickly.

A few things that may stand in your way:

  • ISP Bandwidth limitations for evidence uploads
  • Legal or contractual issues around moving evidence into the cloud
  • The sheer volume of evidence for upload

Upload of a local .E01

Presumably, you’ve imaged and hashed your evidence, made sure it’s not encrypted with FileVault or BitLocker and you’re ready to dig in. We can now upload some evidence to our AWS storage volume for analysis.

There are many SSH clients out there which you can use for transferring evidence to AWS, PuTTy being the most commonly used. As I’m an unwashed Mac user, my personal favourite is Cyberduck.

Screen Shot 2018-06-29 at 9.26.50 am

Once we have connected through SSH we can upload our evidence and as you can see this 7GB image is going to take around 30 minutes over a business fibre broadband connection.

Screen Shot 2018-06-29 at 9.36.12 am

Once our evidence is uploaded we, of course, want to hash it again for integrity checks and for continuity.

ubuntu@ip-17x-x1-x-x9:/mnt/evidence$ md5sum Evidence101.E01


We can now get into the fun stuff. 🙂

Screen Shot 2018-05-29 at 9.06.36 pm

Tools like Log2Timeline will work with as many threads as you can allocate and this is where your more beefy instances with more CPU grunt will really shine.

Looking at the Windows options for online analysis, there is obviously a vast swathe of forensic tools which can be run in Windows too. Although, the issue with some Windows commercial forensic packages is their reliance on hardware dongles. No matter, there’s a solution for that too, which involves setting up a local USB server to share the dongle to a remote host.

Enter VirtualHere.

VirtualHere is also a great way to share dongles across systems in your local network too.

So now we have some processed output, we can either analyse this in place using tools installed in our cloud instance or pull it down using our SSH client to our local system.

Next up, I’ll cover the slightly more complex issue of capturing evidence from an AWS instance.

Reference:

https://www.virtualhere.com/

https://cyberduck.io/

https://putty.org/

https://www.forensicswiki.org/wiki/Encase_image_file_format

https://bsmuir.kinja.com/building-a-licence-dongle-server-with-a-raspberry-pi-1678930193

AWS for Forensics (3)

Connecting to an instance and attaching volumes

Connecting to your instance

By now we should have at least one analysis system in our AWS platform for capturing evidence. We will now need to connect through to this system using our key files so we can configure extra storage and with some analysis tools.

If you haven’t already configured key pairs yet you can access these from the EC2 ‘Network and Security’ menu. It goes without saying that once created you should guard your key file with your life.

Once we have our SSL key file, we can follow the standard AWS process for connecting to our instance.

For Linux instances via SSH:

Screen Shot 2018-06-25 at 12.58.47 pm

Or for Windows instances via RDP:

Screen Shot 2018-06-25 at 1.16.50 pm

Attaching Volumes

As previously discussed, we can attach storage volumes for evidence while configuring our instance or create these after the fact through the ‘Volumes’ menu in EC2. We can also use this method to attach a snapshot as a volume to our analysis instance for imaging.

Screen Shot 2018-05-28 at 8.09.43 pm

As with creating new instances, you will want to record the volume name and assign it some tags for tracking storage volumes. You may also wish to use this feature for evidence naming later on when you are acquiring evidence from AWS.

Screen Shot 2018-05-29 at 11.32.36 am

Once you have your volume created you can choose the instance for which to attach it. This is done by selecting the ‘Actions’ button from the ‘Instances’ menu in EC2.

It should be noted that physical device names will need to be defined based on whether your systems are Windows or Linux.

Screen Shot 2018-05-29 at 12.14.42 pm

Our block device should now be attached to our Ubuntu instance now and we can query that by listing block devices in our instance.

Screen Shot 2018-05-29 at 12.25.59 pm

As our instances are virtual in AWS the Xen storage device format is used (this caught me out the first time around). Our last task will be to create a file system on our block device.

Screen Shot 2018-05-29 at 12.29.29 pm

Once we have our new evidence storage volume attached we can create a mount point and mount our block device.

Screen Shot 2018-06-27 at 1.44.21 pm

That’s about it, we now have an Ubuntu instance configured with a secondary EXT4 storage volume which can be used as a target disk for forensic images or for storing other files/forensic tools for analysis.

Next up, taking snapshots of existing volumes attaching AWS volumes for forensic imaging.

Reference:

https://docs.aws.amazon.com/AWSEC2/latest/UserGuide/ec2-key-pairs.html

https://tools.ietf.org/html/rfc1421

https://tools.ietf.org/html/rfc1424

https://docs.aws.amazon.com/AWSEC2/latest/UserGuide/ebs-creating-snapshot.html

https://askubuntu.com/questions/166083/what-is-the-dev-xvda1-device#166087

AWS for Forensics (2)

My last blog post covered some initial things you might run into when choosing to setup analysis systems in the AWS cloud infrastructure.

Since that last writing, I have had some new experiences in capturing evidence across multiple regions and availability zones in AWS, which has certainly given me some new insight which I can share and hopefully be of some use.

Launching an Instance

In AWS EC2 an instance is just a virtual machine, there are a number of host operating systems and configurations available depending on your use requirements. For the purposes of performing evidence collection or analysis in AWS, you should at least have a system with enough storage attached to capture your evidence. Again, the requirements for your evidence collection may change depending on the type of case you are working on, the locations of these evidence sources and other factors, such as time.

To spin up a system, it is as easy as logging into the EC2 console and choosing the instances menu and your AMI image which is a system image with varying host Operating Systems.

Screen Shot 2018-06-23 at 8.41.33 am

It’s worth noting at this point that there is the option to select “Free tier only”. If you, like me, are a skinflint, this is the one for you.

Screen Shot 2018-06-23 at 8.43.21 am

Once you have decided on your AMI, this is when you can choose the hardware configuration of your system.

Try not to get too carried away here…

Screen Shot 2018-06-23 at 8.49.51 am

The next thing we need to do is configure instance details which relate to Networking, scaling, IAM roles and monitoring.

Screen Shot 2018-06-23 at 8.55.40 am

I’m not going to cover everything on this screen but will drop some links for extra reading.

At a very basic level, the options I would pay attention to are:

1: Shutdown behaviour. If you wish to terminate your instance when it is shut down this will erase storage on any local drives. Probably not best to set this if you’re looking to preserve evidence. Great for an attacker.

2: Enable Termination protection. See above.

3: Cloudwatch Monitoring. Cloudwatch is essentially the equivalent of a console access logging and firewall service. Logs from this are highly valuable when investigating as they can show uploads and access to instances or volumes as well as access to the AWS console itself.

While using AWS for performing any forensic analysis or evidence collection, you should absolutely have this turned on. Auditing and logging of your analysis and processes can be assisted massively with this functionality.

4: Tenancy. The option over tenancy may be something you need to consider for legal parameters as this relates to the shared physical storage devices in the data centre where your instance will reside.

Once we have these configurations, we can move onto adding our storage.

Screen Shot 2018-06-23 at 9.36.37 am

The initial configuration for an Ubuntu AMI in the free tier is 8gb storage. Increasing the boot volume size to at least large enough to store your tools and dependencies is fairly obvious. I’d also attach a volume here to capture evidence to and consider changing the options for “delete on termination”. You can attach and detach volumes later on so if you’re uncertain at this point it is safe to continue without. Encryption of your volume should be fairly self-explanatory.

Creating and adding tags is something I would consider in depth at the earliest outset while scoping your evidence. This is similar to having a naming convention for internal systems in an office or naming evidence exhibits in a case and I found this the best method for maintaining continuity in both of these areas in AWS.

Screen Shot 2018-06-23 at 9.45.05 am

Lastly, we want to lock down access to our instance which is done through “Security Groups”. Security Groups essentially allow us to implement firewall rules to block or allow certain types of traffic via defined IP’s, CIDR blocks, ports and protocols.

Screen Shot 2018-06-23 at 9.50.31 am.png

For my instance, I have configured the security group to only allow access from my own IP at home and at work.

Once we review our instance we can hit launch and within a few minutes we will have our system up and running. Always remember to shut down your instances when not in use, this can become quite a costly affair for the higher spec instances.

Screen Shot 2018-06-23 at 9.56.08 am

Instance State can be changed by right-clicking on the instance. Notice the ‘Name’ column, this is a defined tag in AWS and how I prefer to specify evidence names and analysis systems.


So that’s about it for spinning up your first AWS instance, next I’ll cover how to connect into your instances using different methods.

Reference:

https://aws.amazon.com/autoscaling/

https://docs.aws.amazon.com/AWSEC2/latest/UserGuide/using-spot-instances.html?icmpid=docs_ec2_console

https://aws.amazon.com/documentation/vpc/

https://docs.aws.amazon.com/AWSEC2/latest/UserGuide/iam-roles-for-amazon-ec2.html?icmpid=docs_ec2_console

AWS for Forensics (1)

Initial Account Setup

Emerging Cloud technologies like Amazon Web Services (AWS) are going to change the face of traditional forensics forever. Soon, we will rarely get our hands on physical evidence sources attached to systems like this. This leaves a large number of uncertainties surrounding evidence handling, continuity, security and legal permissions both home and overseas.

Hopefully, this series of posts will help navigate through the acquisition and analysis of these sources.

Some quick observations on account creation:

  • I used a protonmail account to sign up for AWS. (It’s quite common for online services to block protonmail accounts for signup nowadays)
  • You must provide a full address and credit card details for account creation. (Amazon will have this on record if you have the legal authority to request when investigating)
  • Amazon uses their own terminology for everything and there’s a bit to learn if you have no previous experience.
  • It looks strangely like the Kindle store.

Anyway… AWS comes in three different flavours as you can see below: (I chose the cheapest Basic Plan, cause I’m a skinflint)

Screen Shot 2018-05-28 at 7.37.31 pm

Elastic Cloud 2 (EC2) is the service I chose once I selected my plan. Although the LightSail service may provide similar capabilities, I’ll just focus on EC2.

Before you go any further, this is a good point to make some initial assessments.

1: Pricing, what is your budget going forward?

I found that information relating to this was difficult to find prior to punching in the credit card details. I have included at the end of this post the pricing (AUD) for various hardware configurations and data throughput costs as of 28 May 2018.

2: What type of evidence are you analysing and how?

This could range from large batches of server logs, another AWS instance, volume or image. Perhaps you have a forensic image that you already acquired and uploaded for analysis. You may be trying to ascertain successful logons to the AWS platform itself.

It is extremely important at this stage to determine your host OS and the physical characteristics of your instance, such as memory, VCPU’s and storage.

Gaining an understanding of your evidence sources, analysis tools, the load on system resources and the potential size of any exports will help you figure out your AWS configuration.

3: Where is your target evidence located?

Amazon splits web services into international regions and if you wish to analyse a snapshot of another AWS instance, you will need to ensure your analysis instance is hosted within that same region.

I’m not sure of the cost or time implications of transfer between regions but I have been advised this does involve a physical move of data across regions to different data centres.

4: How do you secure the environment and, in turn, your evidence?

Amazon has a number of measures in place to ensure the environment is secure. This includes sys logging for your instances, advanced monitoring (a pay for service) and EC2 key pairs where the .pem private key file can be used for SSH connectivity.

There is also multi-factor authentication through Google authenticator or similar mobile applications and the ability to lock down access to your instance by specific IP addresses and ports. These are just a few suggestions, there are many other factors you may need to consider along the way.

If at this juncture, you are wondering why on earth would I use a system in AWS to perform forensics then I’ll direct you to the general purpose pricing models below where you can check some of the tech specs of the servers!

Next up… I’ll cover how to launch an AWS instance.

AWS Pricing

General Purpose – Current Generation

 vCPU  ECU  Memory (GiB)  Instance Storage (GB)  Linux/UNIX Usage

t2.nano

1

Variable

0.5

EBS Only

$0.0073 per Hour

t2.micro

1

Variable

1

EBS Only

$0.0146 per Hour

t2.small

1

Variable

2

EBS Only

$0.0292 per Hour

t2.medium

2

Variable

4

EBS Only

$0.0584 per Hour

t2.large

2

Variable

8

EBS Only

$0.1168 per Hour

t2.xlarge

4

Variable

16

EBS Only

$0.2336 per Hour

t2.2xlarge

8

Variable

32

EBS Only

$0.4672 per Hour

m5.large

2

10

8

EBS Only

$0.12 per Hour

m5.xlarge

4

15

16

EBS Only

$0.24 per Hour

m5.2xlarge

8

31

32

EBS Only

$0.48 per Hour

m5.4xlarge

16

61

64

EBS Only

$0.96 per Hour

m5.12xlarge

48

173

192

EBS Only

$2.88 per Hour

m5.24xlarge

96

345

384

EBS Only

$5.76 per Hour

m4.large

2

6.5

8

EBS Only

$0.125 per Hour

m4.xlarge

4

13

16

EBS Only

$0.25 per Hour

m4.2xlarge

8

26

32

EBS Only

$0.5 per Hour

m4.4xlarge

16

53.5

64

EBS Only

$1 per Hour

m4.10xlarge

40

124.5

160

EBS Only

$2.5 per Hour

m4.16xlarge

64

188

256

EBS Only

$4 per Hour

Data Transfer IN To Amazon EC2 From

Pricing

Internet

$0.000 per GB

Another AWS Region (from any AWS Service)

$0.000 per GB

Amazon S3, Amazon Glacier, Amazon DynamoDB, Amazon SES, Amazon SQS, or Amazon SimpleDB in the same AWS Region

$0.000 per GB

Amazon EC2, Amazon RDS, Amazon Redshift and Amazon ElastiCache instances or Elastic Network Interfaces in the same Availability Zone

Using a private IPv4 address

$0.000 per GB

Using a public or Elastic IPv4 address

$0.010 per GB

Using an IPv6 address within the same VPC

$0.000 per GB

Using an IPv6 address from a different VPC

$0.010 per GB

Amazon EC2, Amazon RDS, Amazon Redshift and Amazon ElastiCache instances or Elastic Network Interfaces in another Availability Zone or peered VPC in the same AWS Region

$0.010 per GB

Data Transfer OUT From Amazon EC2 To Internet

Pricing

First 1 GB / month

$0.000 per GB

Up to 10 TB / month

$0.140 per GB

Next 40 TB / month

$0.135 per GB

Next 100 TB / month

$0.130 per GB

Next 350 TB / month

$0.120 per GB

Next 524 TB / month

Contact Us

Next 4 PB / month

Contact Us

Greater than 5 PB / month

Reference:

https://docs.aws.amazon.com/AWSEC2/latest/UserGuide/ec2-key-pairs.html

https://aws.amazon.com/iam/details/mfa/